There are many sizes of trees/shrubs and root balls. There are also different types of containers: plastic pots, ball n burlap, and metal cages. No matter the size or container the same planting guidelines apply.
1. Mark Utilities. Be sure to call 1-800-DIG-RITE to properly mark utilities BEFORE digging.
2. Dig the hole. Dig the hole the same depth as the container and a few inches wider.
3. Place the plant. The following are tips on placing the plant in the hole based on the type of container the plant has.
- Plastic pot: Loosen the soil and root ball in the pot by applying pressure to the sides of the pot to make it easier to remove the plant. It is safer and more efficient to hit the sides of the pot (rubber mallet, hammer, hand, etc.) to loosen the root ball. Next, carefully lay the plant on its side and pull at the base of the trunk to pull away from the pot. Do not pull the plant by the top of the trunk or branches as this will damage or even break the limbs.
- Ball n burlap: Place the entire root ball in the hole. Do not remove the burlap (yet), this may cause damage to the roots and cause the root ball to fall apart. This can make it difficult to align the plant during planting.
- Wire cage: Place the plant with the cage into the hole. Do NOT remove or cut the cage away, this can cause serious damage to the roots. The cage will eventually rust away and will not harm the plant.
4. Set the root ball. Be sure the base (area where the trunk meets the soil) of the plant will sit 1-2 inches higher than the ground’s surface. This will ensure the plant is not buried too deep, which can cause suffocation, drown the root ball, and create a pathway for insects into the bark.
Note: Plastic Pots Only. “Tease” (loosen) the roots of the root ball before back filling. This will help the roots to spread out and grow into the ground quicker.
This is a great time to look for potential girdling roots. These are roots that have circled inside the pot. Pull those roots and prune away; if left, these roots will continue to grow around the tree, eventually suffocating itself. Pruning a root or two from the outside of the root ball will not harm the plant.
5. Backfill. Back fill the base of the hole about 1/3 high. Adjust the plant as needed to ensure it is straight (continue to check the alignment as you finish backfilling). Use loose soil (preferably not containing rocks or other debris) and periodically tamp around the root ball to help remove air pockets and stabilize the tree. We suggest using the end of a shovel, heavy rod, pole, etc. You may also use a water hose to begin settling the soil as you go by wetting the soil.
- Plastic Pot: Double check that the base of the trunk is higher than the ground surface.
- Ball n burlap: Cut away the top portion of the burlap and remove all strings/rope. If the burlap is left it will shed water away from the roots, causing desiccation. The remaining burlap below will decompose and not damage the tree.
- Wire cage: At this point the cage should be completely covered by soil. However, there may be ‘rabbit ears’ sticking out the top. These are hooks built into the cage to help transfer the tree within the nursery and deliveries. Using pliers, bend the ears to face down into the hole. This will help prevent trip hazards, weed eaters from grabbing it and mowers hitting the metal. Cut away the top portion of the burlap and remove all strings/rope. If the burlap is left it will shed water away from the roots, causing desiccation. The remaining burlap below will decompose and not damage the tree.
7. Finish backfilling. Bring the soil up to 2 inches below the trunk base. DO NOT BURY the base of the trunk. This will cause many problems, including killing the tree.
8. Extra soil. If there is extra soil, you may create a ‘moat’ around the plant. Build a ring around the entire outer circumference of the hole. Build it just high enough (2-3 inches) to capture water when it rains or when you hand water. Remember, you have planted the tree higher than the ground around it, so there is no threat of drowning. If the tree/shrub is planted in a swampy or wet area, do NOT build a moat.
9. Water. Finish by watering in the tree or shrub. Be sure to soak the area well, allowing the water to percolate into the entire hole. For trees, set a water hose at the base of the tree and let it run at a trickle for at least 30 minutes. Watering will help further settle air pockets (which kill roots) and help the roots to begin growing.
- Water every day for a full week, then start weaning back to every other day and eventually only water as needed.
- If we do not receive much snow or rainfall in the winter months, watering during the winter is recommended.
- Find a full list of watering instructions here.
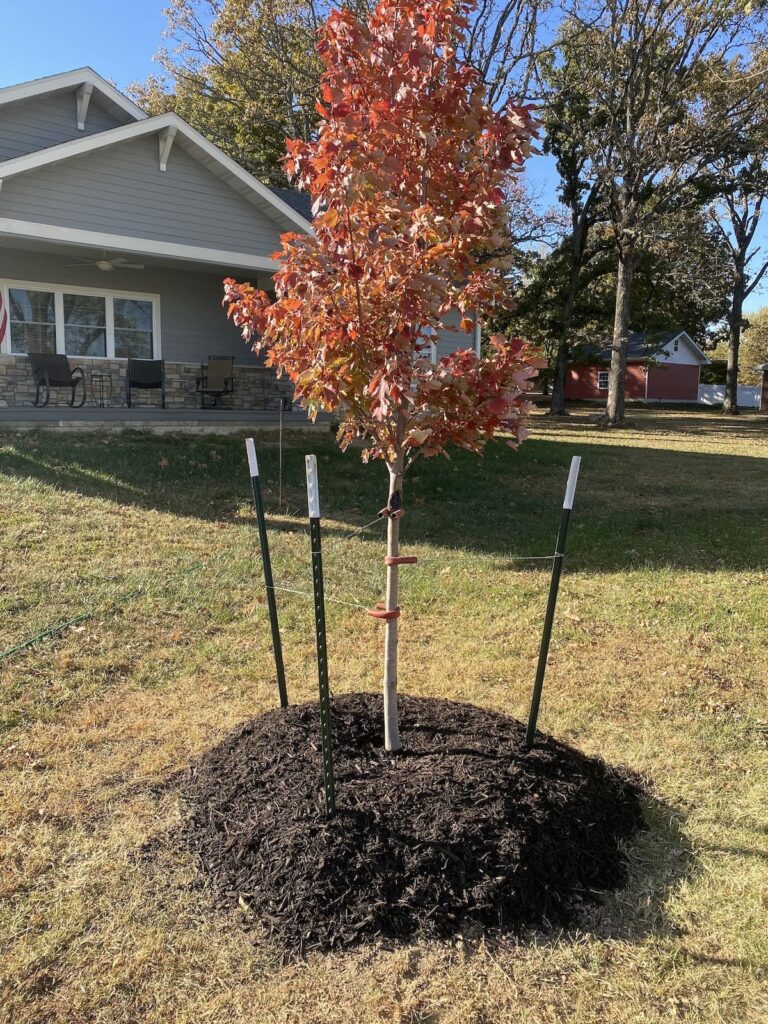
Staking Trees
Staking usually occurs when installing new trees and larger shrubs. Properly staking plants will help insure they grow straight, do not shift, and can withstand storms and heavy winds. Trees and shrubs can be costly and providing the necessary support will help ensure their development and survival.
Materials Needed: 2-3 metal t-posts, 12–14-gauge wire (2-3 24-inch pieces), 2-3 pieces of 6 inch cut rubber garden hose, pliers, wire cutters, screwdriver, post driver (or small sledge hammer).
How to stake a tree:
- Remove the nursery stake (may be a piece of bamboo or wooden stick).
- Smaller trees may only require 2 posts, but others need 3. Place the posts evenly opposite of one another around the tree.
- Drive the posts in a 45-degree angle with the top of the post leaning away from the trunk. Drive the posts about 12 inches into the soil at the same circumference as the outer edge of the hole. Have the notches of the post facing away from the tree.
- Feed each piece of wire through one piece of rubber hose and center it on the strand.
- Bend the rubber piece around the trunk roughly halfway up the tree. Be sure to have the rubber centered on the trunk and not rubbing against a branch.
- Pull both ends of the wire around the post, twist the wires together and secure under one of the notches. Continue the process on the other wires; keep the wires about 6-8 inches apart and at different levels on the trunk.
- Use the screwdriver and stab between the wire strands in the center between the tree trunk and the post. Begin turning the screwdriver, twisting the wire on itself.
- Do not fully tighten until the rest of the wires have been twisted in place.
- Go around and finish twisting the wires with the screwdriver, twist until the wire is just taut. Be careful not to tighten too much. It is IMPORTANT to constantly check the alignment of the tree. You may have to adjust the wires to achieve the proper alignment. Be sure to keep the tree as straight as possible. When finished, cut the excess wire flush at the post.
- Check once again the tree is straight and there is even pressure on all the wires.
- Remove the stakes and wire after 12 months.
____
You’ve planted, staked, and watered— now it’s time to mulch and fertilize!